www.tslotmodbuild.com.au
2525 Concealed Inside Corner End Connector Fastener Bolted Anchor - Steel, Nickel Plated
2525 Concealed Inside Corner End Connector Fastener Bolted Anchor - Steel, Nickel Plated
SKU:PN: 675392
⚠️ Important Shipping Note (Long Items): If your delivery address is outside the Perth Metro area, the system may show a $0.00 shipping cost at checkout. Do not worry! We will contact you directly by phone after you place your order to confirm the most affordable freight options to your remote region or interstate address.
Couldn't load pickup availability
Share
The Strongest Connection on a Budget.
Why pay for bulky, expensive brackets when you can achieve a stronger, cleaner connection for a fraction of the cost? Introducing the Direct-Thread T-Slot Connector, the most economical solution for building robust, professional-grade frames.
This single-component fastener creates a powerful, vibration-resistant joint by directly threading into the core of your T-slot profile. The result is a rigid, hidden connection with unmatched pull-out strength, perfect for machine frames, heavy-duty shelving, and any structure where durability is paramount. By eliminating the need for angle brackets, you get a minimalist, flush finish that looks as professional as it is strong.
Key Features & Benefits:
-
Unbeatable Economy: A single, low-cost component replaces an entire bracket assembly, dramatically reducing your cost per connection.
-
Exceptional Strength: By leveraging the full core of the profile with a direct machine thread, this connector offers superior rigidity and resistance to vibration compared to standard brackets.
-
Clean, Minimalist Finish: The fastener is completely concealed within the profiles, providing a professional, non-obtrusive look for your projects.
-
Simple & Fast Final Assembly: Once the profile is prepared, assembling the joint takes mere seconds.
-
High Clamping Force: The unique side-lever tensioning mechanism allows you to apply significant clamping force, ensuring your joint will never slip.
Ideal For:
-
Machine Guarding and Frames
-
Rigid Workstations and Benches
-
Heavy-Duty Racks and Shelving
-
Simulator Rigs and Jigs
Installation Method & Technical Description
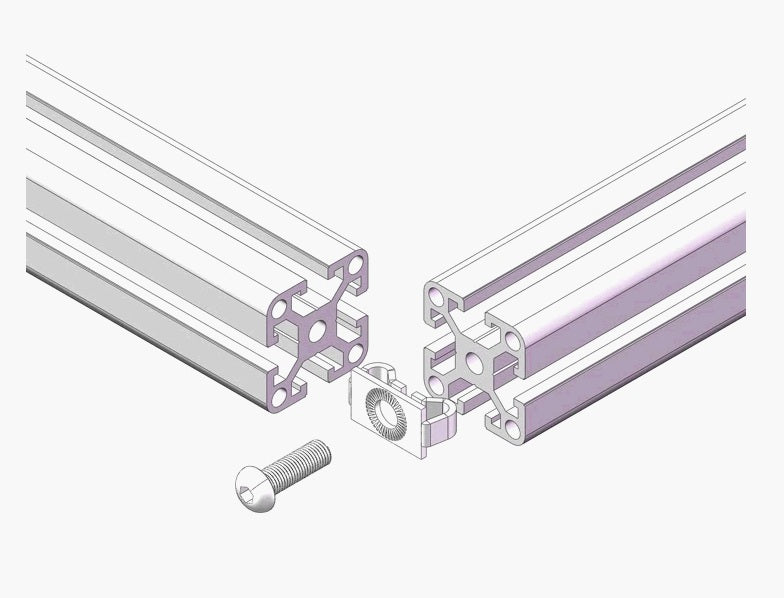
The Direct-Thread Connector is a cylindrical fastener with a machine thread (e.g., M8) on one end and a T-nut head on the other. It is tensioned using a radial hole drilled into its cylindrical body, which accepts a small Allen key as a lever.
🔧 Tools & Components Required:
-
The Direct-Thread Connector
-
Two T-Slot profiles
-
Correctly sized drill bit for the thread tap (e.g., 6.8mm for an M8 tap)
-
Thread Tap (e.g., M8x1.25) and Tap Handle
-
Cutting fluid/lubricant
-
Allen key (typically 4mm or 5mm)
-
Measuring tape and marker
Step-by-Step Installation Guide
The installation is a two-stage process: Preparation of the profiles and Final Assembly.
Stage 1: Preparation
-
Tap the End Profile:
-
Take the profile that will form the "end" of the joint.
- Using your tap handle and tap, carefully cut the machine threads into the hole. Use cutting fluid and back the tap off every half-turn to clear metal chips. Continue until the thread is deep enough for the connector.
-
-
Drill the Access Hole:
-
Take the second profile (the one the first profile will connect to).
-
Measure and mark the location on the side of this profile where the joint will be.
-
Drill an access hole through the side wall of the profile, large enough for your Allen key to pass through. This hole must align with where the tensioning hole on the connector will be once assembled.
-
Stage 2: Final Assembly
-
Insert the Connector:
-
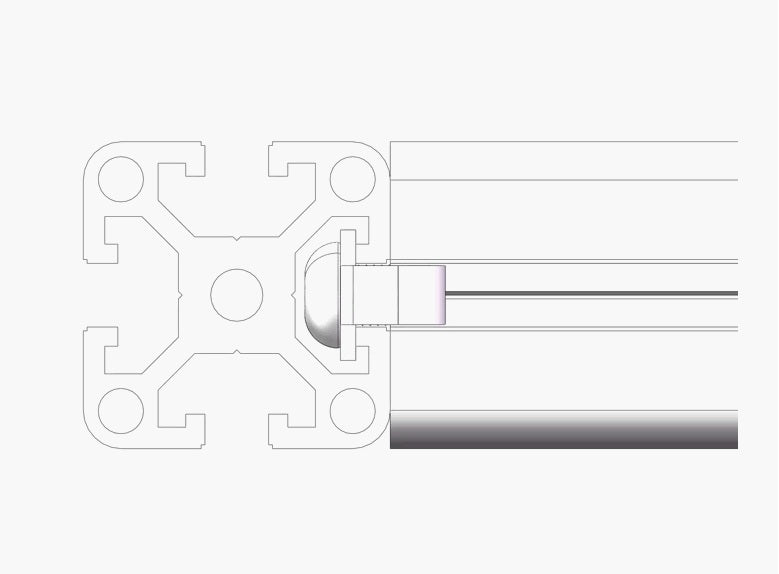
Hand-screw the threaded end of the Direct-Thread Connector into the newly tapped profile. Do not tighten it fully; leave it a few turns loose.
-
-
Position the Profiles:
-
Slide the T-nut head of the connector into the slot of the perpendicular profile.
-
Move the first profile into its final position, ensuring it's square and aligned. The access hole you drilled in Step 2 should now be directly over the connector's body.
-
-
Tension the Joint:
-
Insert your Allen key through the access hole and into the small radial hole on the connector.
-
Using the Allen key as a lever, turn the entire connector clockwise. This action simultaneously tightens the threads into the end profile and pulls the T-nut head tight against the inside of the slot, clamping the two profiles together with immense force.
-
Continue turning until the joint is firm and secure. Do not overtighten.
-
Your connection is now complete—strong, hidden, and incredibly cost-effective.